28 Jan 2007
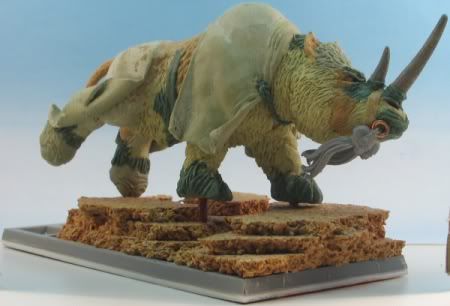
One of the coolest things about an Ogre Army is not even a regular unit! You all know what a Rhinox is so Ill dispense with the explanation. I would love to buy the ones from Forge World, but until I win the lottery they are just going to keep their beautiful, overpriced merchandise (it will be a long time since I dont play the lottery). Sculpting a Rhinox is not a new topic on this site, but I have been working on them for a long time. I started one a while back but its still not finished. It was going ok, but using the fast setting 5 minute epoxy putty limited how much time I had to sculpt. Several people have used green stuff, but that is going to be a lot of green stuff. Even at the discounted price I pay for green stuff I might as well buy the Forge world ones.
As a side note I did try another way of making a Rhinox. I took some white foam and drew two profiles of the Rhinox. While the shape of the body was the same for both, the legs were posed differently. I cut the shapes out with a hot wire knife and then cut each in half. Next I took one of each set of legs and a another with the legs cut off. I hot glued them all together with the legless one in the middle. I rounded this solid blank all around. This gave me a basic shape for the Rhinox. Using a hot glue gun I made thee fur. Although it worked well and had cost almost nothing to make, it was still missing those better details such as the feet, face and the odd spot of missing fur here and their. Sure I could use green stuff for these areas, but I still want a fully sculpted Rhinox. Also for a more solid frame you could use pink foam, which has more density, or even use wood. This would be a great way to make a Rhinox quick, cheap, and fast!
Now onto the project. The material I have chosen is super sculpy (SS). Although I do not promise this will be completely finished, we will see how it goes. I just though it would be better to document this as I go than to try to piece it back together later. Here we go.........
One- The armature
I normally use a cork stopper to sculpt on, but for this guy Im going to need something bigger. I cut a piece of hardboard and drilled a hole in the middle. I added an 1/8" set of hardware In this order nut, washer, hardboard, washer, nut. Now I just have to lock it down tight (not too tight) and Ill have an armature. Since this is stable, I can add foil and the wire supports to it to give the clay strength as I sculpt. When its all done it will leave only a small hole that can be easily filled later. Another thing worth mention is that the wood and metal can be used in the oven when I bake the polymer clay (they will still be hot though).

Now its time to bulk out the shape. This is to reduce the amount of material. Not only for the cost, but if the clay is too thick it will not get cooked on the inside and burn on the outside.

Now the armature is ready to work the clay onto.
Two- Sculpting the body
Ive actually had most of this done since my first post, but i was not sure if I was going to proceed. I think the size is ok so Ill continue. Basically I packed clay on in symmetrical sections. For example two shoulders means I roll two balls of clay about the same size and press them onto the opposite sides. Repeat this for all of the major muscles and bulk. He should look like a Rhinox made of bubbles. Next scrape all of the roundness of the bubbles into each other. Now you have a smooth version from the bubble version. This is where I am now.

It still needs a lot of fine tuning, but as you can see I have started the skin detail on the one leg.
Another update...

As a side note I did try another way of making a Rhinox. I took some white foam and drew two profiles of the Rhinox. While the shape of the body was the same for both, the legs were posed differently. I cut the shapes out with a hot wire knife and then cut each in half. Next I took one of each set of legs and a another with the legs cut off. I hot glued them all together with the legless one in the middle. I rounded this solid blank all around. This gave me a basic shape for the Rhinox. Using a hot glue gun I made thee fur. Although it worked well and had cost almost nothing to make, it was still missing those better details such as the feet, face and the odd spot of missing fur here and their. Sure I could use green stuff for these areas, but I still want a fully sculpted Rhinox. Also for a more solid frame you could use pink foam, which has more density, or even use wood. This would be a great way to make a Rhinox quick, cheap, and fast!
Now onto the project. The material I have chosen is super sculpy (SS). Although I do not promise this will be completely finished, we will see how it goes. I just though it would be better to document this as I go than to try to piece it back together later. Here we go.........
One- The armature
I normally use a cork stopper to sculpt on, but for this guy Im going to need something bigger. I cut a piece of hardboard and drilled a hole in the middle. I added an 1/8" set of hardware In this order nut, washer, hardboard, washer, nut. Now I just have to lock it down tight (not too tight) and Ill have an armature. Since this is stable, I can add foil and the wire supports to it to give the clay strength as I sculpt. When its all done it will leave only a small hole that can be easily filled later. Another thing worth mention is that the wood and metal can be used in the oven when I bake the polymer clay (they will still be hot though).
Now its time to bulk out the shape. This is to reduce the amount of material. Not only for the cost, but if the clay is too thick it will not get cooked on the inside and burn on the outside.
Now the armature is ready to work the clay onto.
Two- Sculpting the body
Ive actually had most of this done since my first post, but i was not sure if I was going to proceed. I think the size is ok so Ill continue. Basically I packed clay on in symmetrical sections. For example two shoulders means I roll two balls of clay about the same size and press them onto the opposite sides. Repeat this for all of the major muscles and bulk. He should look like a Rhinox made of bubbles. Next scrape all of the roundness of the bubbles into each other. Now you have a smooth version from the bubble version. This is where I am now.
It still needs a lot of fine tuning, but as you can see I have started the skin detail on the one leg.
Another update...
kill, crunch, slurp, burp, repeat