
07 Aug 2012
Dreadbois Banner Tutorial!
Well hello there! I thought Id post a tutorial on how I make my banners .i think they look rather snazzy so thought Id share!
First things first .the usual clean up/undercoating/white spray .the boring bit eh?
BASECOAT
Now, as I decided to make the sun red and the background white, I first airbrushed the banner a browny colour; I think its a VAC burnt umber.
This will give the red a lovely base colour and shade it nicely! Once that colour is on, spray it red, concentrating on the raised parts of the banner. I also made it more red towards the bottom end of the banner to give it some contrast!

STENCIL
To make the sun motif, I used tamiya masking tape. I lay down strips of it and cut out all of the shaped that I needed i.e. a circle and a load of really long triangles!
It looked like this :

BANNER TIME
Stick it on the banner! I concentrated it on the corner as it felt right, but you really can put it anywhere. I stuck down circle first and then slowly did the rays, making sure they all made sense on the banner. I used a colour shaper tool to do this; a kind of rubber paint brush (a glorious piece of kit!)

WHITEYWHITEWHITE
I sprayed the banner now with VAC Sand, and then once dry, highlighted it with white, again concentrating on the raised bits.

LET IT DRY!!!!
Then carefully peel off the tape ..slowly slowly yeh?

You will probably have to tidy up some of the lines .
Then its a case of painting the rest of the banner up .and then BOOM!

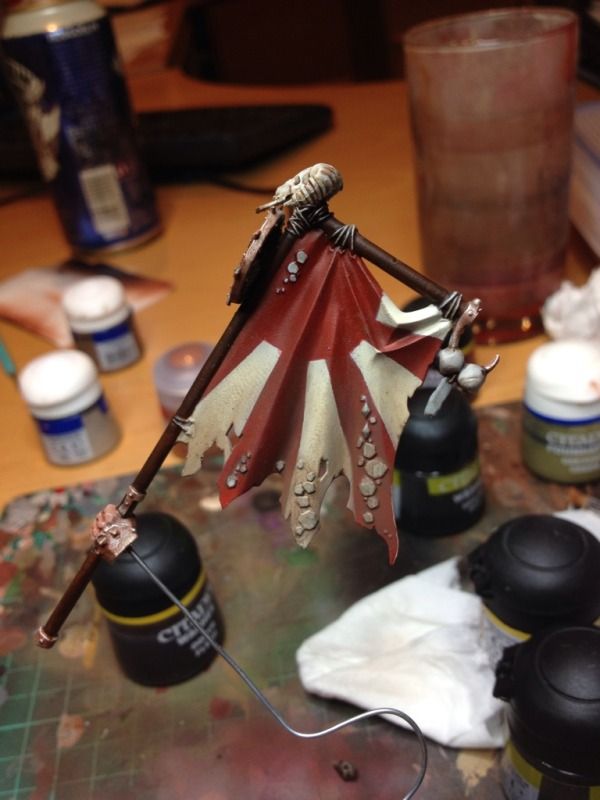
To add some realism, I used Forgeworld Dry Mud weathering powder on it ogre banners are dirty right?!
Also, it really helps it add a sense of story to it something I find VERY important in a miniature.
Hope this helps chaps!!!
Regards,
Dreadboi
Well hello there! I thought Id post a tutorial on how I make my banners .i think they look rather snazzy so thought Id share!
First things first .the usual clean up/undercoating/white spray .the boring bit eh?
BASECOAT
Now, as I decided to make the sun red and the background white, I first airbrushed the banner a browny colour; I think its a VAC burnt umber.
This will give the red a lovely base colour and shade it nicely! Once that colour is on, spray it red, concentrating on the raised parts of the banner. I also made it more red towards the bottom end of the banner to give it some contrast!
STENCIL
To make the sun motif, I used tamiya masking tape. I lay down strips of it and cut out all of the shaped that I needed i.e. a circle and a load of really long triangles!
It looked like this :
BANNER TIME
Stick it on the banner! I concentrated it on the corner as it felt right, but you really can put it anywhere. I stuck down circle first and then slowly did the rays, making sure they all made sense on the banner. I used a colour shaper tool to do this; a kind of rubber paint brush (a glorious piece of kit!)
WHITEYWHITEWHITE
I sprayed the banner now with VAC Sand, and then once dry, highlighted it with white, again concentrating on the raised bits.
LET IT DRY!!!!
Then carefully peel off the tape ..slowly slowly yeh?
You will probably have to tidy up some of the lines .
Then its a case of painting the rest of the banner up .and then BOOM!
To add some realism, I used Forgeworld Dry Mud weathering powder on it ogre banners are dirty right?!
Also, it really helps it add a sense of story to it something I find VERY important in a miniature.
Hope this helps chaps!!!
Regards,
Dreadboi
Open your eyes or the pain will flood in, thought for today is not to give in.
How I Painted My Ogres!
How I Painted My Thundertusk!
How I Painted My Mournfangs!
How I Painted My Ogres!
How I Painted My Thundertusk!
How I Painted My Mournfangs!

