
03 Feb 2012
Hi all, given how helpful I've found Dreadboi's Excellent Thundertusk Tutorial I thought I'd collect some of the tricks I've picked up in one thread, with underlined emboldened titles, organisation, and maybe if we're lucky some mildly grammatically accurate rambling, I don't half go on, so this is your disclamer: There's going to be a lot of text, some bullet points, and a few shabby pictures!

 My god that's cute, and it is now impossible not to have enjoyed this tutorial, and it's not even begun! (Admit it, you aww'd before you even read the first line)
For this you will need:
Blood mix *see below*
GW Paints: Chainmail, Devlan Mud, Scorched Brown, Bleached Bone, Fortress Grey.
Tamiya 'clear' Paints: 'Smoke' (x17) 'Clear Red' (x27)
Nice brushes, I recommend W&N Series 7 or Series 7 Miniature
An airbrush, or the cheaper alternative of a cocktail stick!
Halfords Grey Primer (yes I love it)
I'm demonstrating this on a weapon, but I used it on my bragg mini.
Step 1
Priming, halfords grey all the way; it's the tits, no debate here, buy some, it's amazing to paint over, and it protects your little toy soldiers from the rigours of battle/storage/abuse!

Step 2
Undercoating: Calthan Brown (foundation, good coverage=win!) and chaos black - I always undercoat any area which is going to be silver black, and anywhere gold/bronze brown: = easier smoother coverage.

Step 3
Highlighted straps 1:1 Bleached Bone:Fortress grey, it's a nice neutral mix with good coverage
Blade = Chainmail, three thin (skimmed milk) watered down coats.

Step 4
Everyone's Favourite - Devlan Mud all over, wait for it to dry 100%, if you want more shading go for another coat; I kept it light because the red will show up better on something which hasn't been dulled hugely.

Step 5
Highlights, Chainmail on the edge of the blade, repeat the mix from step 3 on the straps.

Step 6
Airbrush Method: This takes a bit of practice (elsewhere on a piece of paper before the model, once you push that trigger there's no going back), and a dual action airbrush. Turn your pressure down low put in a drop of blood mix, you won't need much pull the needle back, then allow it to go forwards, then press down on the trigger, releasing the pressure, this should make a 'splatter' of blood as the needle released onto the needle is all blown off in one go.
Easier/cheaper Methods
Flick it off a toothbrush (only works if it's not already on the model/you're doing the model in general, or you can mask off the other areas)
Take one toothpick, and dab on your mix, try and keep it 'random'

Step 7
Using your blood mix paint thin streaks down the blade (or in the case of general gore wherever rivulets of blood would form - e.g. if it's flowing down arms then in the creases of the elbow etc).
Repeat as necessary

Step 8
Take your tamiya clear red (perform this step with smoke first if you want it dark) and carefully follow your streaks/where you want the blood to look fresh, this is a V glossy paint, and it's thick, so be careful and take your time, I've not experimented with thinning it yet but I'll edit this if it works.

Done, here's the result on a model

You can apply this anywhere, weapons, bases, cuts and bruises on skin:

A few 'drips' always work well, try to thing how liquid would be have on the model, I used the 'splatter' technique quite a lot on this one:

In essence this 'technique' is an exhibition of how good tamiya clear products are, they're amazing, and versatile!
*Blood Mix*
Mine's made from about 10different paints, mixed until I was happy, basically involve washes, a red, a brown/blow and some water effects and you can't go wrong, mine looks like this:

And contains (roughly)
Paints
Scab Red
Blood Red
Red Gore
Scorched Brown
Chaos Black
Liche Purple
Dark Angels Green
Washes
Purple
Green
Devlan
Red (lots)
Other Stuff
Vallejo water effects
Vallejo Glaze Medium
Gin (I ran out of thinner)
I'd best crack on with another one I guess.
So before we get to the not quite pretty pictures I'll do some explanations of why I use various washes on various metallics, throughout I'll be talking about the GW ones exclusively unless I mention otherwise.
#1 2 Washes is nearly always better than one, not too thick, let them dry between layers, White Dwarf Number (can anyone help me out here) had a great article about using them written by John Blanche a couple of months back, seek it out!
Washes on Silver
Black - darkens shadows, makes contrasts more extreme.
Sepia - Ages things, makes them sepia looking (unsurprisingly), yellows them, great for tarnished looking stuff.
Devlan - Jack of all trades, shades your stuff for you
Ogryn - Interesting effect, brings a little warmth, I prefer Sepia:Devlan:Red 2:2:1ish though for similar(better) effects.
Purple - Makes things look more 'magic', useful if you've got purple elsewhere to tie in, or orange to contast
Green - As above, but yellow to contrast, also can make stuff look mouldy
Blue - 'Magic' but in a very crisp clean cool way, takes down the temperature of the piece, good for high elves.
Red - Not used this much, many layers can make a very nice evil looking armour though, by many i mean about 10:S
Washes on Gold/Bronze
Black - darkens shadows, makes contrasts more extreme.
Sepia - Ages things, makes them sepia looking (unsurprisingly), yellows them, great for tarnished looking stuff.
Devlan - Jack of all trades, shades your stuff for you
Ogryn - Interesting effect, brings a little warmth, I prefer Sepia:Devlan:Red 2:2:1ish though for similar(better) effects.
Purple - Works brilliantly, love the effect of this
Green - As above, if a model has multiple golds I often use both on different pieces to sepparate.
Blue - Not really used this ever, makes for nice interesting contrasted shadows, wouldn't hit something all over though.
Red - Like, hot hot hot, really brings warmth to a piece.
Washes on Bronze
I'm not knowledgable enough to go into this, things look a bit different though
So here we go with some pictures, I used these colours in this order for the prep work (photobucket deleted my pictures):
#1 Primed Halfords Grey,
#2 Undercoated scorched brown (use calthan for lighter bronze/gold, snakebite for mega shiney)
#3 Dwarf Bronze/tin bitz
#4 Dwarf Bronze/shining gold Highlight (Burnished Gold for mentally shiny)
Step 5
Two coats of devlan mud - let it dry thoroughly between each

Step 6 This is a wet palette, I live by the wet palette, it cost me 99p (sponges) and is made from a firebelly tray (lid keeps it wet overnight), wet sponges, and baking paper, capillary action steadily sucks water through to your paint meaning it doesn't dry out so fast.

Step 7
Hawk Turqoise: Frankly the best colour ever released, mixed VERY thin, skimmed milk or less, wet palette stops it from drying out and making another batch of a different consistency.

Alternate Verdigris Mixes/Additions
+Dark Angels Green (usually followed by a 'highlight' of straight HT as above), slightly darker
+Goblin Green - A bit more..gren
+Skull White - Gives a very different (somewhat more realistic) look, you can mix all of the above, play around!
I'm pondering about doing one every weekend or something, we'll see how it goes, I've got a few sets of pictures prepped so I may build up some credit and put out a slew of them in the next few days when my eyes need a break from painting thundertusk horns...
Step 8
Either blob it all over, or concentrate on recesses, I chose the latter:

Step 9
Let it Dry

Done, here's it on a unit of leadbelchers' cannon :

This is going to be a pretty quick one as I've already written in it my other thread, but I've got some pictures now There's not much to write because it's all fairly self evident.
To make snow you will need:
Baking Soda
Pva (white glue/elmers for our US readers)
Water Effects (Optional, makes it dry faster, promotes 'clumping'
A container
A stick
A clean brush
Models!
Step #1: Baking Soda!

Step #2: Pva (mix it in before next step)

Step #3: Water Effects **Optional, see above I tend to use without**

Looks like:

Step #4: Put it on your bases

Don't forget where snow would collect!:

Step #6: If you're using 'tufts' brush a little pva/your snow mix on top, then scatter on some soda to make them look frosted:

Example:

Mix it with PVA, slowly adding more soda until it's really thick (unless you want melt snow, see below). That's it, slop it on your bases, google snow drifts if you want realistic examples, and don't forget those footprints! (Blood + snow = good also)
Fluffy 'Fresh' Snow
Do the above, but after putting your 'snow mix' on the base and waiting 10 mins carefully sprinkl some bi carb on (I drop it from the back of a flat sculpting tool) and blow off the excess.
Brighter than Bright snow - Often combined with fluffy fresh snow.
Either:
Paint white underneath where your snow is going (I use vallejo foundation white because it only needs a couple of coats)
Mix a little white paint with your snow mix, you won't need much.
Meltsnow
Just add more PVA, if your pva is thick add a little water (before or after the bi-carb, not as the same time)
N.B When doing anything to do with snow clean your brushes before! If there's even a trace of red in it for example your scary ogres are now going to look like fat fairies on candy mountain...
So this is a big one (in more ways than one)! Firstly my camera ran out of battery about 2/3 of the way and given that I was trying to assemble and paint this gargantuan piece in one day I didn't have time to wait for it to charge, I'll do my very best to fill in the gaps though.
Here's a picture of the box to let you know what we're dealing with in terms of size: kitten included for scale...

And Inside:


Required tools (didn't use the liquid GS in the end):

Specialist tools: My favourite drybrush (yes it's a makeup brush, seriously it's the best I've ever used, lasts longer than most normal drybrushes as well, this has had hard use for 1 year)

Primed Halfords Grey, Undercoated Chaos Black.

Basecoat (not on roofing if possible): Just a dot of chaos black in there, prob not needed in retrospect.

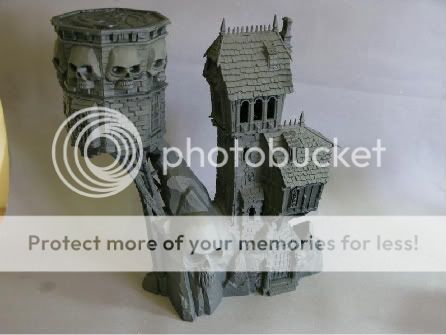
Roof
1-2 I prehighlight the roofing tiles with fortress grey, then skull white, heavy drybrushing will do if you don't have a spray can/airbrush or just can't be bothered to mask off the brickwork).

3-6 My favourite colour comes into play, I went blue+turquoise, Turquoise alone, Turquoise +Skull white, thinned with a bit of medium.


Observatory
1 Undercoated: Scorched Brown

2 Basecoated: Shining Gold+Dwarf Bronze
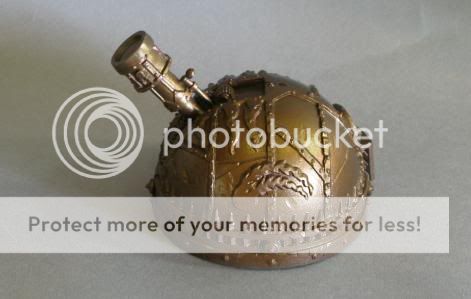
3 Highlighted Shining Gold (drybrush)

4 Mix up dark angels green + hawk turquoise +water, really thin! This will make our verdigris.

5 Splodge it all over, leave it aside to dry:
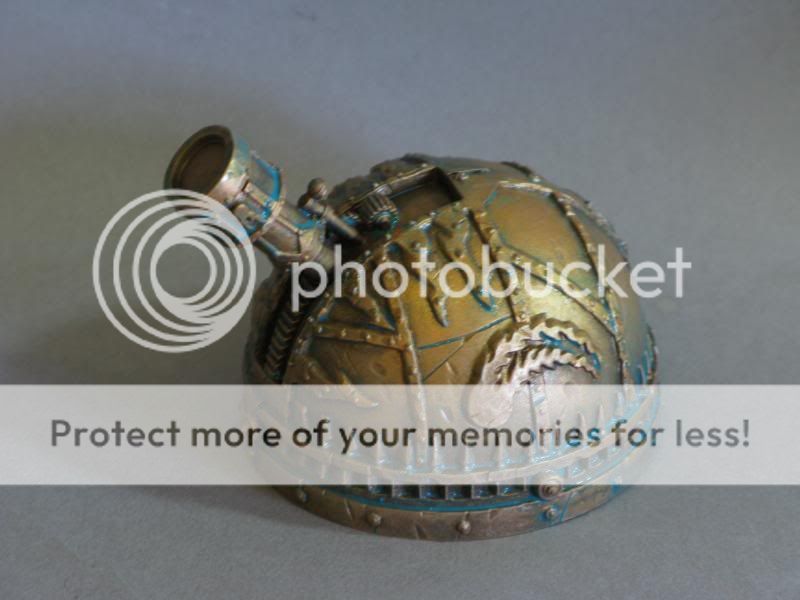
Brickwork
1 Heavy Drybrush of codex grey, all over, be patient, on a model of this size this is literally an hours work or so, a good first layer is irreplaceable.
2 (camera started dying here)
Slightly lighter drybrushing of Codex+ Fortress Grey, still don't be stingy, we're going to be finishing up fairly bright, this isn't a 'light' coating of paint, just not a 'heavy' drybrush.
3 Plain fortress grey, slightly less on the brush for drybrushing now.

4 Finally we're onto what I'd consider to be 'light' drybrushing, still ensure you don't miss any spots, Fortress Grey + Skull White
5 Final Drybrush Highlight: Pure skull white, barely any on the brush, if yours is as thick as mine you'll need to add a *tiny* amount of water, then wipe off all but the dregs elsewhere, my tester is to brush it on the back of my nail, if it's only picking out the very slight ridges you're on track!
I also used this to highlight the roofing tiles, picking out their edges and ridges.:

Camera is Dead at this point, again my apologies
Wood
1 Calthan Brown + scorched brown, all over
2 Sepia + Devlan mud wash all over
3 Bestial + Scorched drybrush
4 Pure Bestial Drybrush
5 Very Light Bestial + Snakebite Drybrush
Golden bits
1 Undercoat with calthan brown+Scorched brown
2 Vallejo Model Colour gold, this thing works wonders, thin it with thinners or alcohol though, do not involve water at any stage, one or two coats should do it, I don't shake the paint but 'swill' it genty around in the pot, this avoids bubbles.
3 Same Verdigris mix as used on observatory
Silver Bits
1 Undercoat Black
2 Base boltgun
3 Wash Devlan
4 Drybrush Boltgun + Chainmail
Skulls! (oh the skulls...)
1 Base Dheneb Stone (2 coats)
2 Wash Devlan Mud
3 Highlight heavy drybrushing of dheneb +bleached (be careful not to get brickwork)
Finally I weathered the parts of the model where I thought dirt/grime would settle with a light drybrush of knarlock green + graveyard earth + scorched brown
Done, Pics:

Link to one million pictures of the finished Manse
Feedback welcome as ever guys. I'll bash out another tutorial fairly soon I think, the pictures are done and that's the fussy bit.
If you see anything on my models you'd like to know how I do hit me up with your questions: if I've got a model where I'm going to be doing it in the near future I may be able to take some pictures and do a writeup, if not I'll always answer questions to the best of my limited ability
Byron
So first here's a picture of my kitten:
My god that's cute, and it is now impossible not to have enjoyed this tutorial, and it's not even begun! (Admit it, you aww'd before you even read the first line)Gore (and a bit of metal)
For this you will need:
Blood mix *see below*
GW Paints: Chainmail, Devlan Mud, Scorched Brown, Bleached Bone, Fortress Grey.
Tamiya 'clear' Paints: 'Smoke' (x17) 'Clear Red' (x27)
Nice brushes, I recommend W&N Series 7 or Series 7 Miniature
An airbrush, or the cheaper alternative of a cocktail stick!
Halfords Grey Primer (yes I love it)
I'm demonstrating this on a weapon, but I used it on my bragg mini.
Step 1
Priming, halfords grey all the way; it's the tits, no debate here, buy some, it's amazing to paint over, and it protects your little toy soldiers from the rigours of battle/storage/abuse!
Step 2
Undercoating: Calthan Brown (foundation, good coverage=win!) and chaos black - I always undercoat any area which is going to be silver black, and anywhere gold/bronze brown: = easier smoother coverage.
Step 3
Highlighted straps 1:1 Bleached Bone:Fortress grey, it's a nice neutral mix with good coverage
Blade = Chainmail, three thin (skimmed milk) watered down coats.
Step 4
Everyone's Favourite - Devlan Mud all over, wait for it to dry 100%, if you want more shading go for another coat; I kept it light because the red will show up better on something which hasn't been dulled hugely.
Step 5
Highlights, Chainmail on the edge of the blade, repeat the mix from step 3 on the straps.
Step 6
Airbrush Method: This takes a bit of practice (elsewhere on a piece of paper before the model, once you push that trigger there's no going back
), and a dual action airbrush. Turn your pressure down low put in a drop of blood mix, you won't need much pull the needle back, then allow it to go forwards, then press down on the trigger, releasing the pressure, this should make a 'splatter' of blood as the needle released onto the needle is all blown off in one go.Easier/cheaper Methods
Flick it off a toothbrush (only works if it's not already on the model/you're doing the model in general, or you can mask off the other areas)
Take one toothpick, and dab on your mix, try and keep it 'random'
Step 7
Using your blood mix paint thin streaks down the blade (or in the case of general gore wherever rivulets of blood would form - e.g. if it's flowing down arms then in the creases of the elbow etc).
Repeat as necessary
Step 8
Take your tamiya clear red (perform this step with smoke first if you want it dark) and carefully follow your streaks/where you want the blood to look fresh, this is a V glossy paint, and it's thick, so be careful and take your time, I've not experimented with thinning it yet but I'll edit this if it works.
Done, here's the result on a model
You can apply this anywhere, weapons, bases, cuts and bruises on skin:
A few 'drips' always work well, try to thing how liquid would be have on the model, I used the 'splatter' technique quite a lot on this one:
In essence this 'technique' is an exhibition of how good tamiya clear products are, they're amazing, and versatile!
*Blood Mix*
Mine's made from about 10different paints, mixed until I was happy, basically involve washes, a red, a brown/blow and some water effects and you can't go wrong, mine looks like this:
And contains (roughly)
Paints
Scab Red
Blood Red
Red Gore
Scorched Brown
Chaos Black
Liche Purple
Dark Angels Green
Washes
Purple
Green
Devlan
Red (lots)
Other Stuff
Vallejo water effects
Vallejo Glaze Medium
Gin (I ran out of thinner)
Verdigris, Washes, Metal, Gutplates.
I'd best crack on with another one I guess.
So before we get to the not quite pretty pictures I'll do some explanations of why I use various washes on various metallics, throughout I'll be talking about the GW ones exclusively unless I mention otherwise.
#1 2 Washes is nearly always better than one, not too thick, let them dry between layers, White Dwarf Number (can anyone help me out here) had a great article about using them written by John Blanche a couple of months back, seek it out!
Washes on Silver
Black - darkens shadows, makes contrasts more extreme.
Sepia - Ages things, makes them sepia looking (unsurprisingly), yellows them, great for tarnished looking stuff.
Devlan - Jack of all trades, shades your stuff for you
Ogryn - Interesting effect, brings a little warmth, I prefer Sepia:Devlan:Red 2:2:1ish though for similar(better) effects.
Purple - Makes things look more 'magic', useful if you've got purple elsewhere to tie in, or orange to contast
Green - As above, but yellow to contrast, also can make stuff look mouldy
Blue - 'Magic' but in a very crisp clean cool way, takes down the temperature of the piece, good for high elves.
Red - Not used this much, many layers can make a very nice evil looking armour though, by many i mean about 10:S
Washes on Gold/Bronze
Black - darkens shadows, makes contrasts more extreme.
Sepia - Ages things, makes them sepia looking (unsurprisingly), yellows them, great for tarnished looking stuff.
Devlan - Jack of all trades, shades your stuff for you
Ogryn - Interesting effect, brings a little warmth, I prefer Sepia:Devlan:Red 2:2:1ish though for similar(better) effects.
Purple - Works brilliantly, love the effect of this
Green - As above, if a model has multiple golds I often use both on different pieces to sepparate.
Blue - Not really used this ever, makes for nice interesting contrasted shadows, wouldn't hit something all over though.
Red - Like, hot hot hot, really brings warmth to a piece.
Washes on Bronze
I'm not knowledgable enough to go into this, things look a bit different though
So here we go with some pictures, I used these colours in this order for the prep work (photobucket deleted my pictures):
#1 Primed Halfords Grey,
#2 Undercoated scorched brown (use calthan for lighter bronze/gold, snakebite for mega shiney)
#3 Dwarf Bronze/tin bitz
#4 Dwarf Bronze/shining gold Highlight (Burnished Gold for mentally shiny)
Step 5
Two coats of devlan mud - let it dry thoroughly between each
Step 6 This is a wet palette, I live by the wet palette, it cost me 99p (sponges) and is made from a firebelly tray (lid keeps it wet overnight), wet sponges, and baking paper, capillary action steadily sucks water through to your paint meaning it doesn't dry out so fast.
Step 7
Hawk Turqoise: Frankly the best colour ever released, mixed VERY thin, skimmed milk or less, wet palette stops it from drying out and making another batch of a different consistency.
Alternate Verdigris Mixes/Additions
+Dark Angels Green (usually followed by a 'highlight' of straight HT as above), slightly darker
+Goblin Green - A bit more..gren
+Skull White - Gives a very different (somewhat more realistic) look, you can mix all of the above, play around!
I'm pondering about doing one every weekend or something, we'll see how it goes, I've got a few sets of pictures prepped so I may build up some credit and put out a slew of them in the next few days when my eyes need a break from painting thundertusk horns...
Step 8
Either blob it all over, or concentrate on recesses, I chose the latter:
Step 9
Let it Dry
Done, here's it on a unit of leadbelchers' cannon :
SNOW!
This is going to be a pretty quick one as I've already written in it my other thread, but I've got some pictures now
There's not much to write because it's all fairly self evident.To make snow you will need:
Baking Soda
Pva (white glue/elmers for our US readers)
Water Effects (Optional, makes it dry faster, promotes 'clumping'
A container
A stick
A clean brush
Models!
Step #1: Baking Soda!
Step #2: Pva (mix it in before next step)
Step #3: Water Effects **Optional, see above I tend to use without**
Looks like:
Step #4: Put it on your bases
Don't forget where snow would collect!:
Step #6: If you're using 'tufts' brush a little pva/your snow mix on top, then scatter on some soda to make them look frosted:
Example:
Mix it with PVA, slowly adding more soda until it's really thick (unless you want melt snow, see below). That's it, slop it on your bases, google snow drifts if you want realistic examples, and don't forget those footprints! (Blood + snow = good also)
Fluffy 'Fresh' Snow
Do the above, but after putting your 'snow mix' on the base and waiting 10 mins carefully sprinkl some bi carb on (I drop it from the back of a flat sculpting tool) and blow off the excess.
Brighter than Bright snow - Often combined with fluffy fresh snow.
Either:
Paint white underneath where your snow is going (I use vallejo foundation white because it only needs a couple of coats)
Mix a little white paint with your snow mix, you won't need much.
Meltsnow
Just add more PVA, if your pva is thick add a little water (before or after the bi-carb, not as the same time)
N.B When doing anything to do with snow clean your brushes before! If there's even a trace of red in it for example your scary ogres are now going to look like fat fairies on candy mountain...
Painting Buildings (nearly) Start to Finish/Skullvane Manse
So this is a big one (in more ways than one)! Firstly my camera ran out of battery about 2/3 of the way and given that I was trying to assemble and paint this gargantuan piece in one day I didn't have time to wait for it to charge, I'll do my very best to fill in the gaps though.
Here's a picture of the box to let you know what we're dealing with in terms of size: kitten included for scale...
And Inside:
Required tools (didn't use the liquid GS in the end):
Specialist tools: My favourite drybrush (yes it's a makeup brush, seriously it's the best I've ever used, lasts longer than most normal drybrushes as well, this has had hard use for 1 year)
Primed Halfords Grey, Undercoated Chaos Black.
Basecoat (not on roofing if possible): Just a dot of chaos black in there, prob not needed in retrospect.
Roof
1-2 I prehighlight the roofing tiles with fortress grey, then skull white, heavy drybrushing will do if you don't have a spray can/airbrush or just can't be bothered to mask off the brickwork).
3-6 My favourite colour comes into play, I went blue+turquoise, Turquoise alone, Turquoise +Skull white, thinned with a bit of medium.
Observatory
1 Undercoated: Scorched Brown
2 Basecoated: Shining Gold+Dwarf Bronze
3 Highlighted Shining Gold (drybrush)
4 Mix up dark angels green + hawk turquoise +water, really thin! This will make our verdigris.
5 Splodge it all over, leave it aside to dry:
Brickwork
1 Heavy Drybrush of codex grey, all over, be patient, on a model of this size this is literally an hours work or so, a good first layer is irreplaceable.
2 (camera started dying here)
Slightly lighter drybrushing of Codex+ Fortress Grey, still don't be stingy, we're going to be finishing up fairly bright, this isn't a 'light' coating of paint, just not a 'heavy' drybrush.
3 Plain fortress grey, slightly less on the brush for drybrushing now.
4 Finally we're onto what I'd consider to be 'light' drybrushing, still ensure you don't miss any spots, Fortress Grey + Skull White
5 Final Drybrush Highlight: Pure skull white, barely any on the brush, if yours is as thick as mine you'll need to add a *tiny* amount of water, then wipe off all but the dregs elsewhere, my tester is to brush it on the back of my nail, if it's only picking out the very slight ridges you're on track!
I also used this to highlight the roofing tiles, picking out their edges and ridges.:
Camera is Dead at this point, again my apologies
Wood
1 Calthan Brown + scorched brown, all over
2 Sepia + Devlan mud wash all over
3 Bestial + Scorched drybrush
4 Pure Bestial Drybrush
5 Very Light Bestial + Snakebite Drybrush
Golden bits
1 Undercoat with calthan brown+Scorched brown
2 Vallejo Model Colour gold, this thing works wonders, thin it with thinners or alcohol though, do not involve water at any stage, one or two coats should do it, I don't shake the paint but 'swill' it genty around in the pot, this avoids bubbles.
3 Same Verdigris mix as used on observatory
Silver Bits
1 Undercoat Black
2 Base boltgun
3 Wash Devlan
4 Drybrush Boltgun + Chainmail
Skulls! (oh the skulls...)
1 Base Dheneb Stone (2 coats)
2 Wash Devlan Mud
3 Highlight heavy drybrushing of dheneb +bleached (be careful not to get brickwork)
Finally I weathered the parts of the model where I thought dirt/grime would settle with a light drybrush of knarlock green + graveyard earth + scorched brown
Done, Pics:
Link to one million pictures of the finished Manse

Feedback welcome as ever guys. I'll bash out another tutorial fairly soon I think, the pictures are done and that's the fussy bit.
If you see anything on my models you'd like to know how I do hit me up with your questions: if I've got a model where I'm going to be doing it in the near future I may be able to take some pictures and do a writeup, if not I'll always answer questions to the best of my limited ability
Byron
Ogre Achievements: 16/101
Gnoblog
Byronic's Tutorials, Recently added: Gore!
Gallery of my work
Currently taking commissions, PM me if you're interested.
Gnoblog
Byronic's Tutorials, Recently added: Gore!
Gallery of my work
Currently taking commissions, PM me if you're interested.
